One kind of card I don't often tackle is a "Shaker" card. As fun as they are, I really struggle with all the steps. I wanted to try the Full of Hearts die I have from My Favorite Things which is basically made for Shakers, so here is the final results! The shaker part turned out fine and I was happy with it. Unfortunately, if you look close you will see that the top panel of my card is not entirely straight!! Bummer... but maybe the recipient of the card will be shaking it around so much that she won't notice the crooked-ness! LOL
I designed this card with the MFT Color Challenge in mind. Below are the colors for this challenge. Along with the Heart Full of Love die, I also used a Mixable Stencil "Background Hearts." I used Wild Wisteria sponged onto some Neenah 80 lb card stock for the back of the shaker pocket and the sentiment strip. Here's where you can see some great creations for this Color Challenge
I am also going to enter this card in the Simon Says Stamp Wednesday Challenge "Anything Goes" and the Monday "Love is in the Air."
Welcome to my blog. Six years ago I discovered that making cards was super fun. I keep learning as I watch many expert crafters and artists on the internet. Thanks for stopping by.
Thursday, January 31, 2019
Wednesday, January 30, 2019
Love & Ice Cream
One more card to put on my blog today, a birthday card with ice cream which I made with kids in mind. These sweet treats are from Newton's Nook, colored with Copic Markers. The sentiment is from Reverse Confetti, heat embossed in white on black card stock. I made the striped paper using Happy Plaids from Concord & 9th. I am posting this card in two places: Simon Says Stamp Monday Challenge "Love is in the Air" and Simon Says Stamp Wednesday Challenge "Anything Goes."
Love Cats & Books
Today's card is for my cat loving friend who is part of my book club. I bought a stamp set from Newton's Nook with adorable cat images long ago and wanted to set him up behind a window. So I used several sets to create this card. I'm entering it in two Simon Says Stamps Challenges today: Monday Challenge "Love is in the Air" AND Wednesday Challenge "Anything Goes."
Some of the products used for this card: Newton's Nook, Poppy Stamps (for the shutter & the flower box,) Die Namics Window Die, Reverse Confetti (for the word "Love.") The flowers and leaves were cut from an Impression Obsession die set and colored with copic markers.
For the background panel, I used a large stamp from Altenew which resembles wood texture trying to make this look like the outside of a house (obviously!) I thought the little flowers looked like X's so I placed two under the "love" sentiment! In the end I wasn't sure if I liked the whole composition of this card... feeling it's a bit lopsided. Thanks for visiting.
Sunday, January 27, 2019
Happy Birthday Hearts & Flowers
Speaking of hearts, while I was trying out the new Concord and 9th Hugs & Kisses
Turn-a-bout stamp set, I ended up creating another card!
These various red and pink hearts happily encircled by a black scallop-edged circle die
created a pretty focal point for this birthday card.
The sentiment is from Lawn Fawn. The roses are three step layering stamps
from Altenew "Vintage Flowers" and the background stamp is "Rose Lace" from Gina K Designs. The inside panel has a message from MFT (I believe)
and little hearts on the envelope flap are used to finish this project.
I'm entering this card in the Simon Says Stamp Wednesday Challenge HAVE A HEART.
Smile!
Every once in a while new products "Wow" the paper crafting world! The company Concord and 9th' have created a great success with their Turn-A-bout Stamp sets! I have loved the ones I tried so far. Here's a card using one of them. Simon Says Stamp Wednesday Challenge this week is Have a Heart so my card fits right in!
I recently bought Concord & 9th's Hugs & Kisses Turn-A-bout Stamp. I used it for this card although it's not the focal point. The tiny hearts in shades of pink and red within the larger heart shape were made with the Turn-A-bout set. They were stamped first. Then, I decided to die cut the word SMILE from the middle of the large heart and inlay it back into the center of the heart. On the side I placed several Altenew Sakura Blossoms using dimensional tape. This stamp set is a three step stamp set using several shades of ink in the same basic pink color. A while gel pen for the center of the flowers and dashes around the heart finished the design of this all purpose card.
These are the panels I created for the inside of this card. I used a stencil for the hearts and then stamped the sentiments right on top. By creating two different inserts and leaving them unglued, you can select which one fits your needs in the future. I find this to be so much more useful than adhering a specific message inside a card!
Thanks for checking out my creation today! Happy crafting.
I am adding this card to the Simon Says Stamp Stamptember
Collaboration with Concord & 9th.
Sending Big Hugs
Hi bloggers! Here is a quick Valentine's Day card good for a boy or a girl. Using patterned paper for the background and wide horizontal stripe saves a lot of time in case you need a few of these for the children in your neighborhood. The mailbox image and sentiment are from Sunny Studio, colored with copic markers. Some red and white twine finishes this card. I am entering this card in the Simon Says Stamp Have a Heart Wednesday Challenge.
Happy Valentine's Day Heart
This week's Simon Says Stamp Wednesday Challenge "Have a Heart" means we're getting ready for Valentine's Day of course. So here's my first card for the upcoming holiday!
This is a fairly simple card using some pattern paper behind a double heart shape. The one in the foreground is a die from Hero Arts which automatically cuts small hearts in the large heart. Then you can stamp images or words on the small hearts! The sentiment at the bottom is from Lawn Fawn. This panel was cut using Die Namics Blueprint Sketch 27 scalloped rectangle die and adhered to a standard size card, 4 1/4 by 5 1/2.
Floral Thank You
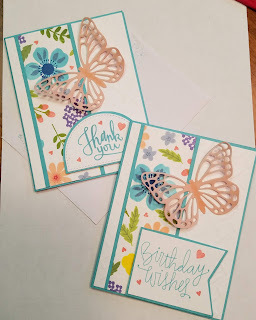
This will be a quick post for the My Favorite Things Sketch Challenge # 421 (see below). I had created some pattern paper using MFT Flashy Floral and Fall Floral Stamp Sets, cut it into rectangle shapes and used it for a few cards. Here are two of them.
The close up shot below shows the dimension of the card base created using an embossing folder; plus more dimension is achieved with a vellum layer on top of the peach layer for the butterfly. The sentiment panel is popped up using dimensional tape.
I also used some of the pattern paper for the inside of my cards, creating multiple panels so there are choices when you need a card! Overall, these cards turned out very lovely. Thanks for stopping by my blog.
Saturday, January 26, 2019
Bright Wishes
I have one more entry for the Simon Says Stamp Alcohol, Drinks or Inks! Wednesday Challenge. The cards below were part of the Christmas Cards which I made this past holiday. I wasn't doing any blogging then, so this is the first time these cards are appearing on social media. That's my disclaimer to assure SSS that these cards haven't been entered in any other challenges before!
I had been experimenting with the Tim Holtz Alcohol Inks which came in a set - and there was Red, Green, and Gold among the colors. I figured these would work well for Christmas backgrounds. I just used the applicator and swiped the colors across the specialty paper, one diagonally, one horizontally.
I don't have all of the products written down for these two cards, but the wreath is from Stampin' Up. I used two shades of green ink and gold embossing for some of the leaves to tie in with the gold alcohol ink. The berries are made with Red Nuvo Drops. The little Elf is from Julie Ebersole for Ellen Hutson. I just love it! The candle is a die from Impression Obsession. The large Wishes die is also from Impression Obsession, and the small "bright wishes" die is from My Favorite Things.
Thanks for visiting my blog!
Hello w/ Alcohol Ink
This Monday, Simon Says Stamp Challenge "Alcohol, Drinks or Inks!" gave us card makers a chance to get some dusty products off our shelves and try them out again! At least that's the way I felt since I don't often reach for my alcohol inks. But, when I do, I am happy with the results. Here's a terrific card which looks fabulous in person. It's difficult to see the vibrant colors and the unusual patterns in the photograph. The close up shows them better. I am entering this card in the SSS Challenge.
I used a combination of Tim Holtz alcohol inks and Copic reinkers for the colors. After dropping some and pouncing some on specialty paper and letting it dry completely, I cut it with the MFT Die Namics Chunky Chevron Cover Up. The beauty of this die is that you poke out all of the chevrons and then select the ones you want to glue back into the frame, leaving spaces open for whatever effect you like. I love how this turned out. Check out the close up photo below!
To finish the card, I layered the cover up panel on some yellow card stock before adhering it to the white card base. A simple HELLO die cut by Julie Ebersole from Ellen Hutson finishes this card which can be used for many occasions.
Feel Better w/ Alcohol Inks
Alcohol Inks entered the card making scene about 4 years ago, but I came late to that party! I bought some supplies and tried them for the first time about 2 years ago. Now, when I decide to get the products out to play around with alcohol inks, it's usually to make backgrounds for cards which is the same as most card makers, I think.
Here is a card I made recently with a flower stamp I like and my favorite rectangle die to use for cutting panels. I chose the blue, green, yellow scheme thinking about the colors of flowers on a sunny day (even though it's the middle of January!)
The alcohol inks were a combination of Tim Holtz and Copic Refills. The scalloped rectangle was cut with DieNamics Blueprint 27. The stamp is from Just Rite - Cherry Blossom; and the sentiment is from Gina K Designs - Vertical Greetings 2.
I am entering this card in the Simon Says Stamp Monday Challenge "Use Alcohol Theme!"Thanks for checking out my blog post today!
Saturday, January 19, 2019
Happy Day!
A quick post today - a card for My Favorite Things Sketch Challenge 420. For this fairly simple card, I made a stencil with the Brickwall Cover Up die from MFT Die Namics Die. Then created the section of brick wall for the card. The grasses are made from Grassy Fields Die Namics. The birdbath and little bird are from Things With Wings Stamp & Die Set. Once again I used the Blueprint Sketch 27 rectangle for the panel, cutting it out of blue card stock and added two light clouds in the sky. Lastly, the sentiment is embossed in white. (In retrospect, I'm sorry I didn't cut the brick wall in a more irregular pattern, rather than straight across.)
Looking back to the beginning...
I was thinking about the beginning of my card making journey and found pictures of the very first ones I made. These were even before I had a die cutting machine. In fact, I believe I only had two or three stamp sets. In the very beginning, I used mostly patterned paper, stickers, ribbon, and sentiments I printed out using my computer! I even made boxes out of paper! These are from the fall of 2014.
Still, many were pretty cute. I'm going to place some of my favorites here just so I have them all in one place. So this is really an effort of indulgence!
The last cards I'll add here are the ones I made for my two grandchildren who were born two weeks apart in October 2014. I see the intricate die cut on the inside, but I don't think I got my Sizziz Big Shot until Christmas 2014! I DO remember using a PASTA MAKER for dies before I got the Big Shot so MAYBE I used it for these although they seem too big to have fit easily in the pasta maker. Oh well, it's a mystery (as Geoffreyy Rush said in Shakespeare in Love!)
Thursday, January 17, 2019
Get Well Soon Gnome
The MFT Gnome Me set was one of my favorites for a long time. I decided to revisit it
for this week's My Favorite Things
Below you will find the sketch
and to the left is my card. I used the Fun and Frolic Pattern Paper from MFT for the three panels of paper stripes (of varying widths)
at the bottom of my card.
The colors all match with the copic markers
I used for the gnome and the mushroom.
The yellow rectangle panel was cut using
Die Namics Blueprint 27. It has scalloped edges and faux stitching. I use this die a lot! The sentiment "Get Well Soon" is from MFT Whimsical Wishes.
Thanks for visiting my blog today!
Clean & Simple Congratulations Baby
This week the Simon Says Stamp Wednesday Challenge is CLEAN & SIMPLE. That just means your creation should be relatively free of clutter, not a lot of embellishments and not too many layers. This is difficult for me because I tend to like layering and adding die cut images and sentiments to my cards. But, I was willing to give it a try. Here is the second Clean & Simple card I finished using a stamp I borrowed from a friend for a Congratulation Baby card. I colored the image with copic markers and stamped the sentiment.
Clean & Simple Flower card
This week the Wednesday Challenge on Simon Says Stamp is CLEAN & SIMPLE. That just means your creation should be relatively free of clutter, not a lot of embellishments and not too many layers. This is difficult for me because I tend to like layering and adding die cut images and sentiments to my cards. But, I was willing to give it a try. Here is the first Clean & Simple card I finished using an Altenew flower set. I did add a few flat gems.
Saturday, January 12, 2019
Deepest Sympathy Peonies
I have a quick post today showing a variation of my previous sympathy card. This one in the color scheme of lavender and green. It uses the same Altenew Leafy Frame Die but with the Gina K. Rose Peonies Stamp & Die set which came in the Sunshine & Love Kit. I colored these the flowers and leaves copic markers (trying to remember my shading training from a class I took with Sandy Allnock a few years back!) The Peonies and the Frame were both new to me so I am entering this card in the Simon Says Stamp Monday Challenge "SOMETHING NEW."
Additional Info -
I only used one Leaf Frame for this design. The lavender card stock was stamped with a large scripty stamp from Just Rite Cling with Distress Oxide Ink Wilted Violet. For some dimension, I used Nuvo drops in the center of the flowers.
Additional Info -
I only used one Leaf Frame for this design. The lavender card stock was stamped with a large scripty stamp from Just Rite Cling with Distress Oxide Ink Wilted Violet. For some dimension, I used Nuvo drops in the center of the flowers.
Thursday, January 10, 2019
Getting Old is for the Birds!
Love, love, love Tim Holtz Crazy Birds! Here is a birthday card with one of them. I had seen a technique on YouTube by Jennifer McGuire HERE a while back and tried it with some stencils I had. You move your stencil several times using different inks, or even using embossing powder for one of the layers. I made 4 or 5 of these "patterned papers" and held onto them until I found the perfect place for them. The greens and blues of this Crazy Bird were a perfect match for my stenciled paper.
Entering this card in the My Favorite Things Sketch Challenge 419 and Simon Says Stamp Wed Challenge Card & Matching Envelope.
The crazy bird was water colored using Zig Markers and the sentiment is from Technique Tuesday, embossed in white. MFT dienamics "Stepped Up Chevron" was used on the card as well as the envelope.The stencil I used for the special technique was from Mint Owl Studios, but you can use many different stencils for this special look. Just vary the colors of your ink.
MFT Dienamics Blueprint 18 gave me the shapes I needed for the pieces under the circles. The Stitched Circle, adhered with dimensional tape, is also from MFT.
I created two panels for the inside of the card and will select one when I actually decide to use the card. Neither one is glued in at the moment! This gives me some flexibility. Thanks for visiting my blog today.
I am going to enter this card in the Simon Says Stamp Stamptember Collaboration with Tim Holtz products! Check out the great entries Here
Happy Birthday Banner & Bloom
Do you take coloring with you when you go away? That's what I did when I went to visit my sister for the holidays. I took my copic markers and some stamped images. When I got back home, I was able to make some cards quickly. Here is one of the colorful birthday cards I made with a new stamp I bought and wanted to try coloring! I made a matching envelope so I could enter it in two Simon Says Stamp challenges in January - Wednesday "Card & Matching Envelope Challenge" and Monday "Something New Challenge."
Banners & Blooms is from Concord & 9th. I stamped it, colored images with copic markers, and cut a square panel using an older Spellbinders Square die with a fancy scallop edge. Mounted this on heavy Neenah card stock roughly 5 x 5 inches.
The envelope and the inside panel have some of the individual stamps colored to match the focal image.
I created two choices for the inside panel. One sentiment is from Power Popper by Marcella Hawley. The other is by Stampendous called "Happy Phrases." Lately, I have been doing this if I am not going to use the card right away so it can be personalized when the time comes.
With Sympathy using Leafy Frame
I'm sure you have been in this boat - you don't NEED new supplies, but you see something online and you MUST buy it! LOL So, that is what happened to me with Altenew Leaf Frame. It was fairly new on the market, but not brand new. Luckily for me, it wasn't sold out. I made several cards with it. This one uses the frame die cut twice and turned around for a fuller affect. I am entering this card in two Simon Says Stamp Challenges: Monday "Use Something New" and Wednesday "Card and Matching Envelope."
I used pale blue card stock for the base and two shades of green for the Leaf Frame. The flowers are from Altenew Sakura Blossom Set, stamped with several shades of blue ink, leaves with green. These are layering stamps with 2 or 3 layers each. "With Sympathy" is a die from Simon Says Stamp. The elegant font matches the feeling of the overall theme of this card. Finally, the envelope and background (see below) for the inside of the card were done with a stencil from Penny Black using a medium blue ink and a sentiment from Hero Arts. Dimension added to the front can be seen in the last picture. Thanks for visiting!
Subscribe to:
Posts (Atom)